Tuesday, December 3, 2013

Three Amigos December Blog Hop

Welcome back to the Three Amigos CTMH Mini-Blog Hop. We are three Close to My Heart Consultants with a love for Stamping and Scrapping and would like to share our creative ideas with you. Each month we are featuring a different CTMH product and create a card, layout or other project. There are only 3 stops on this hop so it will only take a few minutes to hop through. This month we had a color challenge. We each chose one color. The colors we chose were Ruby, Sunset and Buttercup. I decided to put together some of the pages for the new Hip Pics Album using several stamp sets, the new Artbooking Cricut Cartridge, My Crush Assortments, washi tape, sparkles, and a few accents of Outdoor Denim.


The Hip Pics Album comes with 8 white pages with cutouts to easily slip pictures inside.  I removed the pages and rubbed them with a felt distressing tool and Buttercup ink.  For the "Oh Snap" bubble on my last page, I adhered washi tape to Sunset cardstock before cutting the shape with the Cricut.  As usual, my album is a work in progress.  I have four pages left to embellish along with the front of the album.

Thanks for stopping by.  Hop over to Lisa's blog to see what she created.


Sunday, November 3, 2013

Three Amigos November Blog Hop

Welcome to the Three Amigos' November CTMH Mini-Blog Hop.  We are three Close to My Heart Consultants with a love for Stamping and Scrapping and would like to share our creative ideas with you.  On the 3rd day of each month, we will feature a different CTMH product and create a card, layout or other project.  There are only 3 stops on this hop so it will only take a few minutes to hop through.
 
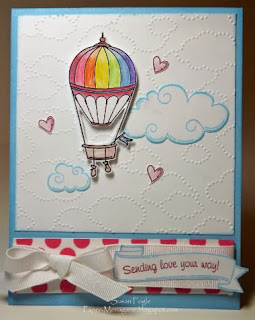
For this month's "Hop," we decided to use anything from the Holidays From the Heart Gift Guide this month. Have you seen all of the fabulous products in this guide yet? I'm in the process of creating a Christmas mini album, but it's not quite ready to show yet.  Today I am going to show you a card I created using the Lifting Spirits stamp set (C1570) and Party Washi Tape (Z1908).


The balloon is colored with our watercolor pencils and popped up off of an embossed cloud background.  I stamped and lightly sponged the clouds with Sky ink.  Did you spot the washi tape behind the white grosgrain ribbon and the sentiment?
 

I tried several different ribbons and bakers twine before settling on the white grosgrain.  It adds just the right amount of softness and allows the washi tape design to peek through.


I decorated the inside of the card as well.  The background hearts are stamped with Sky Ink and appear to be falling from the sky.  I added a few fussy cut clouds and hearts, leaving plenty of space to write a note to the recipient.

Thanks for stopping by!  Hop on over to Lisa's Blog to see what she created to share with you.


Thursday, October 3, 2013

Three Amigos October Blog Hop

Welcome to the Three Amigos' October CTMH Mini-Blog Hop.  We are three Close to My Heart Consultants with a love for Stamping and Scrapping and would like to share our creative ideas with you.  On the 3rd day of each month, we will feature a different CTMH product and create a card, layout or other project.  There are only 3 stops on this hop so it will only take a few minutes to hop through.
 
For this month's "Hop," we chose the "Always Grateful" Stamp set (C1559) which you can purchase for $13.95 on my website.  The images and sentiments in this stamp set make it the perfect stamp set for autumn and winter projects.  I decided to try something less seasonal with my card.

 
I used three strips of Sarita Textiles for the background, rounding the bottom of each strip and fraying the edges.  The burlap ribbon, color-ready seam binding ribbon, and rosewood mini-medley accents "hold" the background in place. 


The sentiment in the stamp set reads, "Today I am thankful."  I inked only part of the sentiment for my card using Saddle ink.


I used the new Vogue Alphabet (E1026) to create the sentiment inside the card and used a square of the Sarita Textiles to mat it.

Now hop over to Lisa's Blog and see what she has created to share with you!
 

Tuesday, September 3, 2013

Three Amigos Blog Hop

Welcome to the Three Amigos' September CTMH Mini-Blog Hop.  We are three Close to My Heart Consultants with a love for Stamping and Scrapping and would like to share our creative ideas with you.  On the 3rd day of each month, we will feature a different CTMH product and create a card, layout or other project.  There are only 3 stops on this hop so it will only take a few minutes to hop through.
 
For our first "Hop," we chose the "Reel Life" Stamp set (B1431) which you can purchase for $9.95 on my website.
 
I originally planned to make a one-page layout for my project today, but it just wasn't working out the way I envisioned.  So, Plan B to the rescue.  I made this card for my daughter who recently moved back to college.  I'll send it with a little care package to help the weeks go by faster in between visits home.


Please excuse the less than stellar picture.  I followed Pattern 28 from the Make It From Your Heart Volume 2 book. Chevrons seem to be all the rage right now and this stamp set has the perfect stamp for creating a custom patterned paper.  Using the three arrow stamp, I stamped with Outdoor Denim ink onto Lagoon cardstock.  To create the chevron, I rotated the stamp 180 degrees and lined up the edges with the first row, repeating until the cardstock piece was covered.  I used the [EPIC] stamp to create the Buttercup tone-on-tone pattern, stamping once with Sorbet ink to emphasize the word and tie it in with the HELLO today phrase.  The frame was cut using the Cricut Artiste cartridge and stamped with the Perfect Fit - Frames 2 stamp set (D1536).  The new Jute Ribbon (Z1867) adds a bit of texture to the card.  I stretched and flattened the ribbon so it wouldn't be so bulky and left the ends a little frayed.  Aqua Dots (Z1853) were attached to the frame as a finishing touch.
 
Now hop over to Lisa's Blog and see what she has created to share with you!


Saturday, July 27, 2013

A Good Day to Play

My friend, Lisa, texted last night, "Scrapbook a bit tomorrow?"  We rarely get the chance to scrap together since she lives 2000 miles and a few time zones away.  My response, "Yes!  I need the creative inspiration!"  Lisa wanted to do something with masking and asked if I had any ideas.  When we signed onto Skype this morning, I still had no idea what we would make.  Winging it, this is what I came up with...


We cut out a fun overlay from the Travel Mini-Album (pg 39) with the new Cricut Artbooking cartridge, temporarily adhered the overlay onto a piece of Colonial White cardstock cut to the same size, and sponged the design using Buttercup, Sunset, and Slate inks.  The color combination was inspired by my favorite new paper pack, Babycakes.  I added a piece of the stripe paper from the Babycakes pack, color ready ribbon inked with Buttercup and Sunset, a dimensional tag stamped with words from the Card Word Puzzle stamp set, and a sentiment from the School Years stamp set.  Oh, and to dress up the masked background a wee bit, I added a small dot of Almond Glitz to the center of each sunburst.  Not bad for a spur of the moment idea!  I'm going to enter this card in the H2H July 1 challenge.  Be sure to check out all of the beautiful artwork on the Heart 2 Heart blog and try a challenge or two while you're there.

Take a peek at Lisa's blog too!  She's been creating up a storm lately!

Thursday, June 20, 2013

A Ray of Sunshine

My girls are the sunshine in my life.  No doubt about it.  This month for the Asbury Scrapbook Class, we created a very simple layout featuring Surf's Up papers and the Patterned Pennants stamp set.  No matter how hard I tried to embellish the layout, the "less is more" look won.


I can't seem to catch the light at the right time to get good photos of my work... sigh.  The clouds were cut on the Cricut with the Artiste cartridge and popped up slightly with foam tape.


I left the background plain for now, but think I might sponge a little White Daisy pigment ink for wispy clouds.

Need to keep moving... too much to do and not enough time.  Thanks for stopping by!


Tuesday, May 14, 2013

Pajama Party


Close To My Heart is teaming up with Big Picture Classes to bring you a live webcast with step-by-step instructions for making this Happy Thoughts kraft container. The FREE webcast will air Thursday, May 30 from 7:00 pm to 8:00 pm (MDT). During the presentation, you’ll learn to make several projects from a variety of sponsors, including Close To My Heart’s Happy Thoughts kraft container, as the presenter walks you through the steps. Watch the Pajama Party by yourself or with your friends for a fun crafting pajama party. Anyone with an Internet connection can watch, so be sure to order your project supplies in advance and then tune in!
The Pajama Party class will be available for FREE at BigPictureClasses.com on May 30. If you would like to interact on the message board, participate in live chat, post to the gallery, download handouts, or enter any contests, you will need to log in to the Pajama Party “classroom” by creating a free account on the Big Picture Classes website.
To make our Happy Thoughts kraft container, you will want to have the following items—or similar products—on hand:
  • My Acrylix® Frame Flair Stamp Set (D1546)
  • My Acrylix® Happy Thoughts Stamp Set (C1536)
  • Chantilly Paper Packet (need 1 sheet of B&T, X7163B)
  • Crème Brulee Cardstock (need 1 sheet, X5754)
  • Lagoon Cardstock (need 1 sheet, X5762)
  • White Daisy Cardstock (need 1 sheet, 1385)
  • Whisper Cardstock (need 1 sheet, X5929)
  • Whisper Exclusive Inks® Pad (Z2172)
  • Lagoon Exclusive Inks® Pad (Z2195)
  • My Creations® Kraft Container (Z1833)
  • Baker’s Twine Neutral Assortment (need 3 yards, Z1701)
  • Color-Ready Trinkets Wooden Shapes (Z1844)
  • Sparkles Black & Grey Assortment (Z1754)
  • 3-D Foam Tape (Z1151)
  • Micro-Tip Scissors (Z534)
  • Corner Rounder (Z1912)
  • Paper Trimmer (Z1783)
  • My Acrylix® Spritz Cleaner (1778)
  • My Acrylix® Stamp Scrubber (Z1782)
  • 2" × 3½" My Acrylix® Block (Y1009)
  • 4" × 5" My Acrylix® Block (Y1012)
  • Cricut® Art Philosophy Collection (Z1790)

Wednesday, April 10, 2013

Quick Cards

The Workshop on the Go card kits are fabulous when you need to whip up a card in a pinch.  The instructional brochure lists all of the materials needed and includes the cutting guide and insturctions to complete the cards.  I had about an hour of "idle" time a few days ago and decided to make one of each of the cards in the Chantilly kit.  I completed all three cards with time to spare.


These cards were fast, simple, and easy.  I love that I could start with the designs from the workshop kit and tweak them slightly to suit my taste.  I only changed a few minor things, ommitting some of the wooden badge buttons, stamping my banners on scrap cardstock and hand cutting them, and inking the edges of everything.


Stamping the banners on scrap cardstock and cutting them out allowed me to ink the edges and add dimension to the card.  The wooden badge button on the Birthday Wishes card looked a little bare to me, so I stamped a flower on it before attaching it to the card.


The banners on the Happy Birthday card are all stamped, hand cut, inked, and adhered as well.  I omitted the badge buttons from this card and added a bow of baker's twine to the ribbon.


I did a little extra stamping on the Hope Your Day is Happy card.  The workshop brochure instructs you to stamp the sentiment background in desert sand and add the sentiment in lagoon.  I decided to add a little color to the sentiment by stamping the background in sweet leaf on a cardstock scrap, cutting out the rectangular piece (which I stamped with the lagoon sentiment), and adhering it over the desert sand rectangle.  You can see the contents of the workshop kit on page 22 of the Spring/Summer Idea Book.  If Chantilly is not your paper of choice, the card patterns are also included in Make It from Your Heart Volume 1.

Happy Scrapping!

Thursday, April 4, 2013

Buzz and Bumble Card

Ever have one of those moments when you know exactly what you want to create and you actually have the time to sit down and work on it? Last week, while I was perusing Pinterest, I came across a card by Danielle Kennedy that made me immediately think of the Buzz and Bumble Papers. Her work is stunning!  With the exception of the little bees, the card actually went together fairly quickly.
 

The Buzz and Bumble assortment would have been perfect for this card, but I didn't have it at the time.  To recreate the little bee silhouettes, I sketched the shape I wanted onto a scrap piece of cardstock and cut it out.  They are less than half an inch in size.  I glued small strips of the patterned papers to a strip of cocoa cardstock, adhered my pattern with temporary adhesive, and cut around the pattern.


The wings of the bees are slightly bent upward to make them appear as if they are buzzing around the card.  The sentiment is from the Honeycomb stampset and the flowers were cut from an image on the Fabulous You stamp set. I cut the beehive on the cricut from the Walk in My Garden cartridge and popped it up with 3-D foam tape.

I've been working on a few other projects that I hope to have photographed and posted soon.  Thanks for stopping by!


Tuesday, February 26, 2013

Finally!

I haven't been feeling very creative lately.  With three volunteer positions that feel more like an (unpaid) full time job, I rarely have the energy to to pull out my supplies.  Last weekend, I decided to set aside my chore to do list, took a hiatus from my volunteer work and got crafty with two of my very creative friends.

On Friday, my friend, Donna, invited me over to craft.  I took along my Later Sk8r paper pack and the For Always Card WOTG kit.  Donna is so creative and I always come home inspired and ready to make more (visit her blog here).  She made a beautiful card using the March stamp of the month, Floral Happiness and let me make one while I was there.  The card is stunning in Sunset.  She also made one using Gypsy.


I shared a card with her that I put together at the Boston Croppers crop last month using the Chantilly papers.  The card was a big hit at the crop.  The lighting in the picture doesn't do it justice.


I managed to put together one card fromthe For Always Card WOTG.  The ribbon included in the kit seemed too thin for the design, so I substituted Slate Satin Polka-Dot Ribbon instead.  I planned to change up the colors too, but decided to stick with the kit suggestion for now.  I like the exclusive stamp set that comes with the kit.  This card can be used for any Woo Hoo moment in life.


When we received our new idea book papers, Donna showed me a card she made using the Later Sk8r paper pack and the Born to Ride stamp set.  I had that card in mind when I packed my supplies for the day.  I changed mine up a little bit, but the design and idea is hers.  I love how she stamped the inside too and kept mine the same.


All of the creating didn't end on Friday when I had to head home.  On Sunday, my friend, Lisa, and I finally found a chance to Skype-scrap.  We haven't had a chance to scrap together since she moved across the country last September.  We scrapped together for over 3.5 hours and had so much fun!  Her new scrap room is beautiful!  I shared my Chantilly card with her and then made her design a card on the spot.  Nothing like a little pressure to turn out an amazing design!  We used the Later Sk8r papers and the Wheel of Life stamp set.  We cut the gears using the Art Philosophy Cricut cartridge, sanded a little to distress, inked the edges (I ink everything), and added a few embellishments.


I added Green & Blue Epoxy Bubbles and gears from the Later Sk8r Assortment on my card.  I originally planned to use a chipboard spinner, but it was too heavy for the card.  I stamped and cut out my spinner instead.  Here's a little detail shot:
 
 
I'm going to tuck this card into a little care package for my daughter.  Check out Lisa's card here and get a little peek at her amazing craft space too).
 
Thanks for sticking with me through this long post.  I hope it was worth the wait!


Thursday, January 3, 2013

Happy New Year

Wait... what???  Where did the time go?  Shortly after my last post, I dropped my daughter off at college, caved in to a friend's pleas to be the PTSA Treasurer, became the finance secretary at church, tried not to fall into a depressive abyss when a dear friend moved across the country, and caught that awful cold that put me out of commission for two weeks (and then a thrid week to recoup).  I managed to create the layouts for my monthly class and put together a couple cute projects.  The pictures aren't loaded onto my computer yer, but I promise to post them very soon.