Thursday, February 19, 2015

Happy Chinese New Year!

Happy New Year! We are now entering the year of the Goat. I read somewhere that it's Chinese tradition to avoid having children during the year of the goat because it's considered unlucky. We are starting out this new year with some misfortune, but we have every intention of turning the misfortune into opportunity!

A few weeks or so ago, Cricut offered the Chinese characters as a free cut. I found this cute project in the Cricut Design Space "make it now" area which cut six Chinese characters and mini envelopes to hold a treat. I cut the envelopes from cranberry cardstock. The characters were cut from retired gold metallic paper I had in my stash. The meaning of each character was written on the flaps of the envelopes with the pen inserted into the Cricut Explore.


Adding the cut characters to the envelopes was a little tricky. Some of the pieces are very tiny and kept sticking to my fingers. I used the negative areas from the cuts for the placement.


I filled the envelopes with milk chocolate gold coins. My daughter works at a Chinese restaurant and is excited to give them to her co-workers.


May your New Year be filled with Love, Honor, Friendship, Home, Strength, and Fortune!


Thanks for stopping by!

Supplies Used:
1272 Cranberry Cardstock
Gold Metallic Paper (Retired)
Cricut Explore and Design Space

Tuesday, February 10, 2015

Bokeh Technique

A week or so ago, I came across the Bokeh technique here using watercolor for the background. I was anxious to try it after I finished my blog hop project and a couple other odds and ends. Bad news came our way just after the blog hop, putting most of my crafting on hold. Then, just last Friday, I saw this tutorial using a sponged background. Since sponging is less messy, I decided to try it first. I pulled out my inks, sponges and a left over piece of cardstock that I previously cut various sizes of circles from.

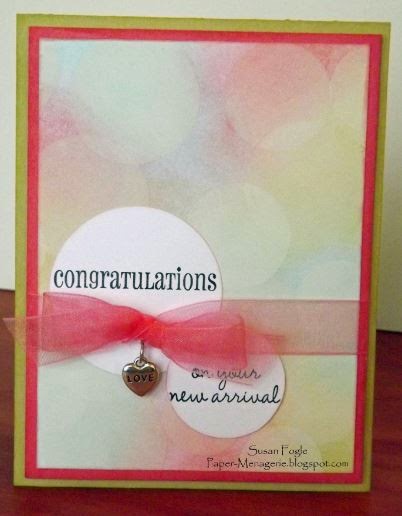
My first attempt at the technique uses colors drawn from the Hopscotch paper pack. I made a baby card for my new little niece. I can't wait to send it!


I found it difficult to capture the true effect of the technique with the camera. here's a side view.


I tried to stamp my sentiment directly to the front of my card with less than stellar results. As Bob Ross says, "We don't make mistakes, just happy little accidents." I pulled out two white daisy circles left over from another project and covered up my "happy little accident." The circles play off of the sponged circles in the technique.


I added a silver charm from the Base & Bling Storyteller Charms Assortment. Since the Bokeh technique is the real focus of the card, the charm was just right. All of the sentiments on this card are from the Cute Koalas stamp set.


To maintain the austerity of the card, I stamped the sweet sayings at the bottom and left plenty of room for a heartfelt message.

The second card is more masculine since I needed a birthday card for my dad. I only sponged two ink colors onto the panel of the card before adding the Bokeh circles. The Glacier and Flaxen inks on this card are softer and harder to capture on camera.


I stamped the sentiment on vellum for this card and attached it with Flaxen Extra Thick Twine. I added a few Gold Sequins, but kept it simple so the Bokeh design would really shine.


The sequin on the vellum banner also hides a glue dot that holds the banner in place. I kept the inside of this card simple as well.


This technique is really fun and addicting. I encourage you to try it!
Thanks for stopping by today!

Supplies Used:

Baby Card:
D1642 Cute Koalas
X5771 Flaxen Cardstock
X5763 Smoothie Cardstock
1385 White daisy Cardstock
Z2641 Glacier Ink
Z2642Flaxen Ink
Z2196 Smoothie Ink
Z2105 Black Ink
Z2163 White Daisy Pigment Ink
Z1959 Storyteller Charms Assortment
Pink Carnation Ribbon (retired)

Birthday Card:
C1605 Happy to Be Friends
D1635 Assorted Edges
X5771 Flaxen Cardstock
X5770 Glacier Cardstock
1385 White Daisy Cardstock
Z2641Glacier Ink
Z2642 Flaxen Ink
Z2105 Black Ink
Z2163 White Daisy Pigment Ink
Z3036 Flaxen Extra Thick Twine
Z2012 Gold Sequins Assortment
Other: Vellum

Tuesday, February 3, 2015

February Three Amigos Blog Hop

Welcome to the Three Amigos Blog hop.  We are three Close to My Heart Independent Consultants with a love for stamping and scrapping and would like to share our creative ideas with you.  On the 3rd of each month we feature a different CTMH product and create a card, layout, or other project.  There are only three stops on this hop so it will only take a few minutes to hop through.

This month's challenge was to mix and match papers from different paper packs. I saw a "make it now" designed project for the Cricut Explore that would be perfect for my girls' valentines. I made a set of tags to adorn the cute Designer Creations Takeout Boxes in the Annual Inspirations Idea Book.

Since the takeout boxes are embossed with white hearts, I knew they would be perfect to hold valentine treats for my girls. I used the Tender Pink Shin Han marker to randomly color a few of the hearts on the box. For the tags, I used the black and glacier dot B&T paper from the Snowhaven pack, and the lagoon hearts and Arrows B&T papers from the Heartstrings paper pack. I added red glitter hearts from the Stuck on You Puffies and a bow tied from retired Baby Pink organdy ribbon.


Here's what the takeout box and tag looked like before I put the entire project together.


I tied several colors and styles of current and retired CTMH ribbon to the handle of the takeout box to give it a little frill. Most of the ribbon on the handle came from my scrap jars. Even though the jars look pretty with all of the colorful ribbon in them, using it up felt good!


I attached the tag with white hemp (retired) and opted to tie it with a bow instead of a knot to make it removable. The box will be filled with assorted chocolates and a heart shaped brownie that I will bake just before mailing. Both girls are away at college and receiving packages really makes their day!

Thanks for stopping by today. Hop over to Lisa's blog and then Donna's blog to see what they created!

Supplies Used:
X7188B Snowhaven Paper Pack
X7193B Heartstrings Paper Pack
Z2050 Designer Creations Takeout Boxes
Z3037 Stuck On You Puffies
Z2060 Thin 3-D Foam Tape
Z1989 Slate Diagonal Striped Ribbon
Retired CTMH Ribbon (Baby Pink Organdy, Blush Dot grosgrain, Cranberry Grosgrain, Heavenly Blue Organdy, Hollyhock stitched, Lagoon Satin, White Ric Rac)


Monday, February 2, 2015

Brrrr! It's Cold Outside!

A major winter storm is passing through the area today, leaving piles of the white stuff in it's wake. I've never been a fan of winter, especially Buffalo winters! The Snowhaven layouts I'm sharing today seem fitting given the weather. I love the cranberry and glacier in this paper pack and how the black makes them pop.


The Warm & Cozy layout was inspired by a Scrapbook Generation layout I saw on Pinterest. I could only see part of the layout in the picture, but knew Snowhaven was the perfect paper pack to recreate it. I can't locate the picture on their website, but they have some very nice sketches and photos worth checking out.


I may add some more bling once I get photos on the layout. Journaling strips will adorn the space to the left of the first photo mat.


It's hard to see the sparkle of the shimmer trim in the pictures and the bitty sparkles on the snowflakes, but they add to the snowy theme. I tried different angles. Nothing captured the essence of the shimmer trim.


My Making Spirits Bright layout was inspired by a layout from Shannon Buck, CTMH Director of the Stampin' Buds team. I love the symmetry of the layout. Instead of using banners in the bottom section of my layout, I decided to use the snowflake border from the Cricut Artbooking collection (page 76 in the image booklet).


The layout looks very red right now, but once pics are added the red will be more of an accent than a focus.


The resin accents from the Snowhaven Assortment add depth and texture to the layout. White shimmer trim and red enamel hearts dress up the Snowhaven Complements.


Bitty sparkles are sprinkled around the layout, and more white shimmer trim adds a frosty touch to the snowflake border. The line of trees stamped tone on tone along the bottom are from the Snowhaven Card WOTG stamp set.

Thanks for stopping by on this very cold day!

Supplies Used:
X7188B Snowhaven Paper Pack
X7188C  Snowhaven Complements
Z3008 Snowhaven Assortment
G1085 Snowhaven WOTG Cardmaking Kit (stamp set)
Z2173 Slate Ink Pad
Z2116 Cranberry Ink Pad
Z2641 Glacier Ink Pad
Z2009 Red Enamel Hearts
Z3024 White Shimmer Trim
Z1906 Cricut Artbooking Collection