Friday, July 3, 2015

Three Amigos July Blog Hop

Welcome to the Three Amigos Blog hop.  We are three Close to My Heart Independent Consultants with a love for stamping and scrapping and would like to share our creative ideas with you.  On the 3rd of each month we feature a different CTMH product and create a card, layout, or other project.  There are only three stops on this hop so it will only take a few minutes to hop through.

This month we are sharing a blast from the past. I'm sharing a Fourth of July layout I put together about 5 years ago. This layout is simple, but perfectly showcases the photos. I used the Reflections pattern book for my layout designs, and stamps to create a custom patterned paper. The right page features a flip flap, allowing me to add an additional picture and journaling without cluttering the original design.


I dry embossed the cut-out stars and sanded them to reveal the embossed pattern. The USA letters are dimensional elements. The phrase "made in the" was created from alphabet rub-ons.


I added a flip flap on the right page and used one of the cut-out stars to hold the flap closed.


Thank you for stopping by today. Hop over to Lisa's blog and Donna's blog to see what they created for you.


Wednesday, June 3, 2015

Three Amigos June Blog Hop

Welcome to the Three Amigos Blog hop.  We are three Close to My Heart Independent Consultants with a love for stamping and scrapping and would like to share our creative ideas with you.  On the 3rd of each month we feature a different CTMH product and create a card, layout, or other project.  There are only three stops on this hop so it will only take a few minutes to hop through.

This month we are featuring the Stitch Guide or Ruler with the Piercing Tool. I created the Confetti Wishes Workshop on the Go layout and added a little bit of stitching on the pages to go along with the stitched accents. We are in the midst of relocation activities around here, and I can't find the box my camera  was stuffed into. I had to use my iPad to take pics for this post, so the quality may seem sub-par. I can't make the pics any larger for viewing here either. Sigh. You can barely see the stitching in the first photo, but it's there.


I added the stitching around a few of the stamped star embellishments. The stitch guide has four circle sizes to choose from. I temporarily placed my embellishment on my layout, centered the circle on the stitch guide over my embellishment, and used the piercing tool to poke holes to sew through. If you squint and look closely, you'll notice I also stitched around the star shapes on the photo mats. The stitch guide contains all sorts of shapes and patterns. 


The title and stamped embellishments were also heat embossed with clear embossing powder to add a little more texture to the layout.

Thank you for stopping by today. Hop over to Lisa's blog and Donna's blog to see what they created for you.


Sunday, May 3, 2015

Three Amigos May Blog Hop

Welcome to the Three Amigos Blog hop.  We are three Close to My Heart Independent Consultants with a love for stamping and scrapping and would like to share our creative ideas with you.  On the 3rd of each month we feature a different CTMH product and create a card, layout, or other project.  There are only three stops on this hop so it will only take a few minutes to hop through.

This month we are featuring the Happy Everything stamp set. Close To My Heart will donate $3 of the proceeds of each Happy Everything stamp set purchased to Operation Smile. I love the sentiments included in this stamp set! April was a busy month around here, leaving very little time to be creative. I designed my card to send to my mom, and also for a make-and-take project at an all day crop I attended yesterday.


I paired patterned paper from the Brushed paper pack with Smoothie cardstock, black Shimmer Trim, and Flamingo Dots that I colored with the black Shin-Han alcohol marker. The black accents really make the colors in the card pop and plays off of the black outlines in the paper.


I added more patterned paper and smoothie cardstock to the inside to dress it up a little. The sentiment says "Because you're a one-of-a-kind, fabulous person."

After I created my card, I remembered I used some of the sentiments on the insides of a couple other cards I haven't shared yet. The first Card is from the Blossom Workshop On The Go set.


The second card uses Jackson papers and the Dizzy Circles stamp set.


Thank you for stopping by today. Hop over to Lisa's blog and Donna's blog to see what they created for you.


Friday, April 3, 2015

Three Amigos April Blog Hop

Welcome to the Three Amigos Blog hop.  We are three Close to My Heart Independent Consultants with a love for stamping and scrapping and would like to share our creative ideas with you.  On the 3rd of each month we feature a different CTMH product and create a card, layout, or other project.  There are only three stops on this hop so it will only take a few minutes to hop through.

This month our projects will feature washi tape. The Seasonal Expressions 2 idea book debuted yesterday chock full of paper crafting goodness. The two new washi tape packs were just begging to be used together on a card. I pulled out the new Wavy Blooms stamp set, a few of my Shin Han Markers, White Daisy Cardstock, and the Boardwalk and Carnival Washi Tape Packs and got to work. I wasn't sure about the bright colors at first, but love how vibrant the card turned out.


The thin washi tape is perfect for creating a woven plaid design. You can see how the colors show through at the intersections.


I kept the inside simple, adding a touch of washi tape and a Kraft Cardstock mat.


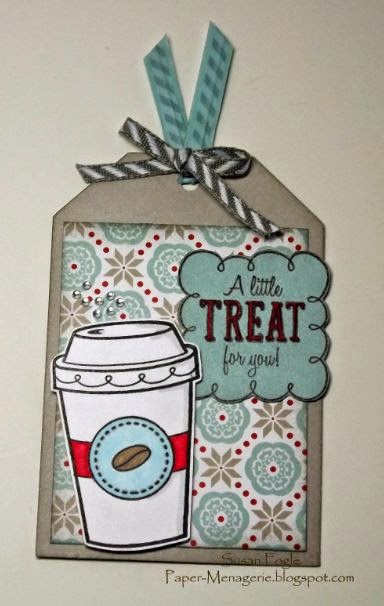
As I was cleaning up my studio the other day, I came across a few scraps of Snowhaven Paper and extra Cricut cut tags. I decided to assemble the pieces and make a few tags that can go on gifts or adorn a card. I used the thin Glacier Washi Tape on the Slate Twist Ties as an experiment and liked the result. It's hard to tell in the picture, but the cup has "Bitty Sparkles" steam coming from the top.


Thanks for stopping by today! Be sure to check out Lisa's blog and Donna's blog to see what they have created for you!

Supplies Used:

Card:
D1651 Wavy Blooms
1385 White Daisy Cardstock
Z1375 Kraft Cardstock
44751 Archival Black Ink Pad
Z2469 Shin Han Colorless Blender
Z2454 Shin Han Leaf Green
Z2465 Shin Han Turquoise Blue
Z2461 Shin Han Peacock Green
Z2464 Shin Han Tender Pink
Z2452 Shin Han Golden Yellow
Z3066 Boardwalk Washi Tape Pack
Z3067 Carnival Washi Tape Pack
Z3042 Coral Reef Sequins
X254 White Cards with Envelopes
Z2060 3-D Foam Tape

Tag:
C1616 Treats of Frendship
X7188B Snowhaven Paper Pack
44751 Archival Black Ink Pad
Z2469 Shin Han Colorless Blender
Z2448 Shin HanCarmine Red
Z2445 Shin Han Barely Beige
Z2451 Shin Han Clay
Z1864 Slate Twist Ties
Z1989 Slate Diagonal Striped Ribbon
Z3066 Boardwalk Washi Tape Pack
Z1263 Bitty Sparkles
Z2060 3-D Foam Tape
Other- Shin Han Frost Blue Marker

Tuesday, March 3, 2015

Three Amigos March Blog Hop

Welcome to the Three Amigos Blog hop.  We are three Close to My Heart Independent Consultants with a love for stamping and scrapping and would like to share our creative ideas with you.  On the 3rd of each month we feature a different CTMH product and create a card, layout, or other project.  There are only three stops on this hop so it will only take a few minutes to hop through.

This month we are featuring the Stamp of The Month, Choose Happy. This stamp set can only be purchased during the month of March, so get it while you can. With a qualifying $50 purchase, you can add Choose Happy for just $5!


I used the wooden frame, doodle lines, and "you're special" stamp images from Choose Happy. To fill the frame, I stamped a couple images from The Happy Couple stamp set and colored them with our Shin Han markers. The Glacier background was created using wax paper and ink. A small strip of B&T paper from the Seaside Paper Pack pulls the bouquet colors across the card.


A few of the flowers and the bow are popped up with Thin 3D Foam Tape to add a little dimension and interest. I stamped the wood frame with Desert Sand ink, colored it in with the Clay Shin Han marker, and then stamped the image again with Cocoa ink. Stamping with the lighter color first set up guidelines for coloring. Over-stamping with the dark ink allowed the wood grain design to show without blurring from the marker.


I used the same wax paper background on the inside of the card as well. I dressed up the corners with one of the doodle line images stamped off of the paper.


The wax paper technique only took six easy steps to achieve.

1. Cut two pieces of cardstock to the desired size.
2. Cut one piece of wax paper slightly larger than the cardstock pieces.
3. Crumple the wax paper into a ball, open, re-crumple to get lots of wrinkles, and open again.
4. Make a "sandwich" of scrap paper-cardstock piece-wax paper-cardstock piece-scrap paper.
5. Using an iron set to high heat with NO steam, press and lift the iron over the entire "sandwich". Make sure to press and lift repeatedly in order to get the wrinkly design.
6. Lay cardstock pieces with wax side up and sponge with ink to reveal the pattern.

Thanks for stopping by today. Hop over to Lisa's blog and then Donna's blog to see what they created!

Supplies Used:
S1503 Choose Happy
X7192B Seaside Paper Pack
1385 White Daisy Cardstock
X5642 Cocoa Cardstock
X5770 Glacier Cardstock
X5751 Sorbet Cardstock
Z2114 Cocoa Ink
Z2641 Glacier Ink
Z2451 Clay Shin Han Marker
Z2455 Light Orange Shin Han Marker
Z2452 Golden Yellow Shin Han Marker
Z2454 Leaf Green Shin Han Marker
Z2465 Turquoise Blue Shin Han Marker
Z697 Sponge
Z1263 Bitty Sparkles
Z2060 Thin 3-D Foam Tape
Wax Paper
Frost Blue Shin Han Marker (B182)

Thursday, February 19, 2015

Happy Chinese New Year!

Happy New Year! We are now entering the year of the Goat. I read somewhere that it's Chinese tradition to avoid having children during the year of the goat because it's considered unlucky. We are starting out this new year with some misfortune, but we have every intention of turning the misfortune into opportunity!

A few weeks or so ago, Cricut offered the Chinese characters as a free cut. I found this cute project in the Cricut Design Space "make it now" area which cut six Chinese characters and mini envelopes to hold a treat. I cut the envelopes from cranberry cardstock. The characters were cut from retired gold metallic paper I had in my stash. The meaning of each character was written on the flaps of the envelopes with the pen inserted into the Cricut Explore.


Adding the cut characters to the envelopes was a little tricky. Some of the pieces are very tiny and kept sticking to my fingers. I used the negative areas from the cuts for the placement.


I filled the envelopes with milk chocolate gold coins. My daughter works at a Chinese restaurant and is excited to give them to her co-workers.


May your New Year be filled with Love, Honor, Friendship, Home, Strength, and Fortune!


Thanks for stopping by!

Supplies Used:
1272 Cranberry Cardstock
Gold Metallic Paper (Retired)
Cricut Explore and Design Space

Tuesday, February 10, 2015

Bokeh Technique

A week or so ago, I came across the Bokeh technique here using watercolor for the background. I was anxious to try it after I finished my blog hop project and a couple other odds and ends. Bad news came our way just after the blog hop, putting most of my crafting on hold. Then, just last Friday, I saw this tutorial using a sponged background. Since sponging is less messy, I decided to try it first. I pulled out my inks, sponges and a left over piece of cardstock that I previously cut various sizes of circles from.

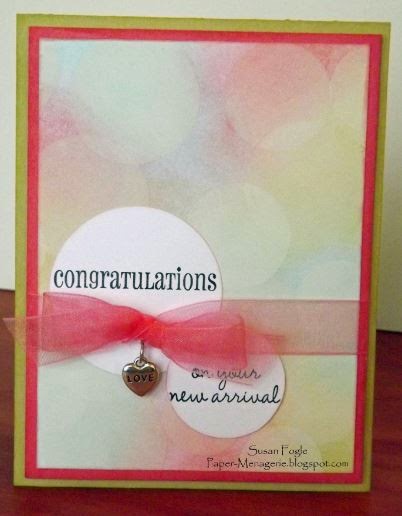
My first attempt at the technique uses colors drawn from the Hopscotch paper pack. I made a baby card for my new little niece. I can't wait to send it!


I found it difficult to capture the true effect of the technique with the camera. here's a side view.


I tried to stamp my sentiment directly to the front of my card with less than stellar results. As Bob Ross says, "We don't make mistakes, just happy little accidents." I pulled out two white daisy circles left over from another project and covered up my "happy little accident." The circles play off of the sponged circles in the technique.


I added a silver charm from the Base & Bling Storyteller Charms Assortment. Since the Bokeh technique is the real focus of the card, the charm was just right. All of the sentiments on this card are from the Cute Koalas stamp set.


To maintain the austerity of the card, I stamped the sweet sayings at the bottom and left plenty of room for a heartfelt message.

The second card is more masculine since I needed a birthday card for my dad. I only sponged two ink colors onto the panel of the card before adding the Bokeh circles. The Glacier and Flaxen inks on this card are softer and harder to capture on camera.


I stamped the sentiment on vellum for this card and attached it with Flaxen Extra Thick Twine. I added a few Gold Sequins, but kept it simple so the Bokeh design would really shine.


The sequin on the vellum banner also hides a glue dot that holds the banner in place. I kept the inside of this card simple as well.


This technique is really fun and addicting. I encourage you to try it!
Thanks for stopping by today!

Supplies Used:

Baby Card:
D1642 Cute Koalas
X5771 Flaxen Cardstock
X5763 Smoothie Cardstock
1385 White daisy Cardstock
Z2641 Glacier Ink
Z2642Flaxen Ink
Z2196 Smoothie Ink
Z2105 Black Ink
Z2163 White Daisy Pigment Ink
Z1959 Storyteller Charms Assortment
Pink Carnation Ribbon (retired)

Birthday Card:
C1605 Happy to Be Friends
D1635 Assorted Edges
X5771 Flaxen Cardstock
X5770 Glacier Cardstock
1385 White Daisy Cardstock
Z2641Glacier Ink
Z2642 Flaxen Ink
Z2105 Black Ink
Z2163 White Daisy Pigment Ink
Z3036 Flaxen Extra Thick Twine
Z2012 Gold Sequins Assortment
Other: Vellum