Saturday, October 17, 2015

Sangria Slider Card Instructions


Remember this card? Time sure did get away from me. Here are the instructions for the Sangria Slider Card I posted here. Writing the steps out proved to be a little more difficult than I imagined. I wrote them, re-wrote them, and tweaked them a little more. I'm sure they are far from perfect, but you should be able to recreate the card by following the steps outlined. Don't hesitate to ask for clarification if you need it.

Slider Card Instructions
Finished card size 4 ¼ x 5 ½


Front (Chevron B&T) 4 ¼ x 5 ½
Back (Pomegranate CS) 4 ¼ x 5 ½
Inside Sentiment (Colonial White CS) 3 ¼ x 4 ½  
Slide Piece (Colonial White) 3 1/8 x 4 3/8
Mat (Pomegranate) 2 ¾ x 4
Focal Piece (Colonial White) 2 7/16 x 3 1/8

Prepare Front:
1. Align 5 ½ inch side along 1 inch on paper cutter. Start cutting blade at 4 ½ inch mark and cut to 1 inch mark.
2. Turn piece ¼ turn. Align 4 ¼ inch side along 1 inch on paper cutter. Start cutting blade at 3 ¼ inch mark and cut to 1 inch mark.
3. Turn piece ¼ turn. Align 5 ½ inch side along 1 inch on paper cutter. Start cutting blade at 4 ½ inch mark and cut to 1 inch mark.
4. The uncut 4 ¼ inch side will be the top of the card. Align the top along 1 inch on the paper cutter. Score between the cut lines.
5. Slide the top to align along 2 ½ inch on the paper cutter. Score between the cut lines.
6. Slide the top to align along 4 inch on the paper cutter. Score between the cut lines.
7. From the top, fold the scored lines valley-hill-valley.

Prepare Back:
1. Adhere inside sentiment to card back, centered.
2. Apply adhesive around sides and bottom of card back as close to inside sentiment as possible.
3. Attach front piece to back piece, aligning tops of each piece.
4. Find the center of the top edge and punch a thumb notch (you can use the new thumb notch punch or half of a 1” circle punch).

Slider:
1. Insert slider piece between top and bottom of card.
2. Apply adhesive to the back side of the ½ inch scored flap of front piece, align with bottom edge of slider piece, and adhere.
3. Cut ¾ inch off of mat to create two pieces measuring 2 ¾ x 3 ¼ and 2 ¾ x ¾
4. Apply adhesive to top side of the center scored flap on card top. Attach 2 ¾ x 3 ¼ mat.
5. Apply adhesive to top side of ½ inch scored flap on card top. Attach 2 ¾ x ¾ mat aligned with larger mat.
6. Stamp/decorate focal piece.
7. Attach focal piece to 2 ¾ x 3 ¼ mat piece (centered).
8. Embellish 2 ¾ x ¾ mat piece as desired (zip strips, complements, twine, ribbon, etc.)
9. Stamp sentiment on inside of card.

Thank you for stopping by today and for being so patient!


Saturday, October 3, 2015

Three Amigos October Blog Hop

Welcome to the Three Amigos Blog hop.  We are three Close to My Heart Independent Consultants with a love for stamping and scrapping and would like to share our creative ideas with you.  On the 3rd of each month we feature a different CTMH product and create a card, layout, or other project.  There are only three stops on this hop so it will only take a few minutes to hop through.

This month we challenged each other to make an interactive card. The challenge is a perfect fit since our hop falls on World Cardmaking Day this year! A year or so ago, I offered a slider card as a make and take at a crop. The card was a huge hit, so I decided to make another for our challenge. Sangria is the featured paper pack at CTMH this month. I used the Sangria WOTG and Sangria Complements to create my card.


Don't be fooled when you see a WOTG geared for scrapbooking. Many times the stamp set is versatile enough for making cards as well. I stamped the leaves in Pear Ink and the flowers in our new Pomegranate and Eggplant Inks. All of the flowers are fussy cut with a bitty sparkle in the center. The two eggplant flowers are popped up with foam tape. The word "FRIEND" is stamped in Chocolate Ink using the Jennifer's Hand Stamp Set.


The inside sentiment is revealed when you slide the card open. I stamped the sentiment in Chocolate Ink to coordinate with the stamped word on the front. I used part of a boarder strip from the Sangria Complements to decorate the slider strip under the focal point, but you could easily use a zip strip, twine, ribbon, or a stamped border.


A personal message can be written on the front and back side of the slider piece and will be revealed when slid up from the card.

I am in the process of writing the directions to create this card and will post them as soon as they are ready (it took me a while, but the directions are now posted). Thank you for stopping by my blog today. Hop over to Lisa's blog and Donna's blog to see what they have created for you.

Supplies Used:
B1484 Jennifer's Hand
G1097 Sangria WOTG
X7199C Sangria Complements
Z2653 Pomegranate Ink Pad
Z2647 Eggplant Ink Pad
Z2197 Pear Ink Pad
Z2111 Chocolate Ink Pad
Z1263 Bitty Sparkles
Z2060 Thin 3-D Foam Tape


Thursday, September 3, 2015

Three Amigos September Blog Hop

Welcome to the Three Amigos Blog hop.  We are three Close to My Heart Independent Consultants with a love for stamping and scrapping and would like to share our creative ideas with you.  On the 3rd of each month we feature a different CTMH product and create a card, layout, or other project.  There are only three stops on this hop so it will only take a few minutes to hop through.

Before I begin with my hop project, I would like to thank you for being so patient with my lack of blogging since the July hop. We have been in the midst of a relocation from Western New York to Michigan. The moving van pulled up to pack my house on July 17th and left with all of my belongings, including my August hop project, on July 21st. Our WNY closing was delayed by the buyer for nearly two weeks, which put us into August and all of our belongings into storage. Sadly, my beautiful mom passed away unexpectedly in the midst of our move on July 29th. I miss her terribly every single day! This is one of my favorite pictures of Mom captured by my niece earlier this year.


The new Annual Inspirations Idea Book and Holiday Expressions went live just two days ago! If you haven't seen all of the crafty goodness yet, be sure to check them out. With the release of the AI and HE Idea books, we decided to feature new products this month. Throughout the month of September, CTMH will showcase two new paper packets, Zoe and Nevermore. I chose to make a layout using the Halloween themed Nevermore Paper Pack, Complements, and Accessories. My layout was heavily inspired by the layout on page 8 of the Holiday Expressions book. I kept the basic design of the layout and switched up some of the embellishments.


I plan to put this picture of my daughter from last year on the layout as soon as I get it printed. I might do a bit of editing first to blur the background, but haven't had the chance yet.


The new Complements include Kraft and thick plastic die-cuts as well as cardstock stickers.I used a variety of them in the top left and bottom right corners of the page.


The spider is a stamp from the new Steampunk Scoundrels set. I stamped it on Kraft cardstock with black ink to tie in with the complements I used and fussy cut it for the page.  The spider web is one of the cool thick plastic die-cuts. I hoped to use the new  Grey Enamel Gems, but discovered they were not part of my initial Idea Book order. I used our retired black and grey epoxy bubbles instead.

Thank you for stopping by today. Hop over to Lisa's blog and Donna's blog to see what they created for you.

Supplies Used:
B1503 Steampunk Scoundrels
Y1006 3x3 Block
X7198B Nevermore Paper Packet
X7198C Nevermore Complements
Z3083 Nevermore Assortment
Z1375 Kraft Cardstock
Z2105 Black Ink Pad
Z2173 Slate Ink Pad
Z1979 Marvy Uchida LePen journaling Pen
Z2060 Thin 3-D Foam Tape
Z1836 Nonstick Scissors
Z697 Round Sponge
Z1471 Ruler
Z3022 3L EZ Dots Adhesive
1778 Spritz Cleaner
Z1782 Stamp Scrubber

Friday, July 3, 2015

Three Amigos July Blog Hop

Welcome to the Three Amigos Blog hop.  We are three Close to My Heart Independent Consultants with a love for stamping and scrapping and would like to share our creative ideas with you.  On the 3rd of each month we feature a different CTMH product and create a card, layout, or other project.  There are only three stops on this hop so it will only take a few minutes to hop through.

This month we are sharing a blast from the past. I'm sharing a Fourth of July layout I put together about 5 years ago. This layout is simple, but perfectly showcases the photos. I used the Reflections pattern book for my layout designs, and stamps to create a custom patterned paper. The right page features a flip flap, allowing me to add an additional picture and journaling without cluttering the original design.


I dry embossed the cut-out stars and sanded them to reveal the embossed pattern. The USA letters are dimensional elements. The phrase "made in the" was created from alphabet rub-ons.


I added a flip flap on the right page and used one of the cut-out stars to hold the flap closed.


Thank you for stopping by today. Hop over to Lisa's blog and Donna's blog to see what they created for you.


Wednesday, June 3, 2015

Three Amigos June Blog Hop

Welcome to the Three Amigos Blog hop.  We are three Close to My Heart Independent Consultants with a love for stamping and scrapping and would like to share our creative ideas with you.  On the 3rd of each month we feature a different CTMH product and create a card, layout, or other project.  There are only three stops on this hop so it will only take a few minutes to hop through.

This month we are featuring the Stitch Guide or Ruler with the Piercing Tool. I created the Confetti Wishes Workshop on the Go layout and added a little bit of stitching on the pages to go along with the stitched accents. We are in the midst of relocation activities around here, and I can't find the box my camera  was stuffed into. I had to use my iPad to take pics for this post, so the quality may seem sub-par. I can't make the pics any larger for viewing here either. Sigh. You can barely see the stitching in the first photo, but it's there.


I added the stitching around a few of the stamped star embellishments. The stitch guide has four circle sizes to choose from. I temporarily placed my embellishment on my layout, centered the circle on the stitch guide over my embellishment, and used the piercing tool to poke holes to sew through. If you squint and look closely, you'll notice I also stitched around the star shapes on the photo mats. The stitch guide contains all sorts of shapes and patterns. 


The title and stamped embellishments were also heat embossed with clear embossing powder to add a little more texture to the layout.

Thank you for stopping by today. Hop over to Lisa's blog and Donna's blog to see what they created for you.


Sunday, May 3, 2015

Three Amigos May Blog Hop

Welcome to the Three Amigos Blog hop.  We are three Close to My Heart Independent Consultants with a love for stamping and scrapping and would like to share our creative ideas with you.  On the 3rd of each month we feature a different CTMH product and create a card, layout, or other project.  There are only three stops on this hop so it will only take a few minutes to hop through.

This month we are featuring the Happy Everything stamp set. Close To My Heart will donate $3 of the proceeds of each Happy Everything stamp set purchased to Operation Smile. I love the sentiments included in this stamp set! April was a busy month around here, leaving very little time to be creative. I designed my card to send to my mom, and also for a make-and-take project at an all day crop I attended yesterday.


I paired patterned paper from the Brushed paper pack with Smoothie cardstock, black Shimmer Trim, and Flamingo Dots that I colored with the black Shin-Han alcohol marker. The black accents really make the colors in the card pop and plays off of the black outlines in the paper.


I added more patterned paper and smoothie cardstock to the inside to dress it up a little. The sentiment says "Because you're a one-of-a-kind, fabulous person."

After I created my card, I remembered I used some of the sentiments on the insides of a couple other cards I haven't shared yet. The first Card is from the Blossom Workshop On The Go set.


The second card uses Jackson papers and the Dizzy Circles stamp set.


Thank you for stopping by today. Hop over to Lisa's blog and Donna's blog to see what they created for you.


Friday, April 3, 2015

Three Amigos April Blog Hop

Welcome to the Three Amigos Blog hop.  We are three Close to My Heart Independent Consultants with a love for stamping and scrapping and would like to share our creative ideas with you.  On the 3rd of each month we feature a different CTMH product and create a card, layout, or other project.  There are only three stops on this hop so it will only take a few minutes to hop through.

This month our projects will feature washi tape. The Seasonal Expressions 2 idea book debuted yesterday chock full of paper crafting goodness. The two new washi tape packs were just begging to be used together on a card. I pulled out the new Wavy Blooms stamp set, a few of my Shin Han Markers, White Daisy Cardstock, and the Boardwalk and Carnival Washi Tape Packs and got to work. I wasn't sure about the bright colors at first, but love how vibrant the card turned out.


The thin washi tape is perfect for creating a woven plaid design. You can see how the colors show through at the intersections.


I kept the inside simple, adding a touch of washi tape and a Kraft Cardstock mat.


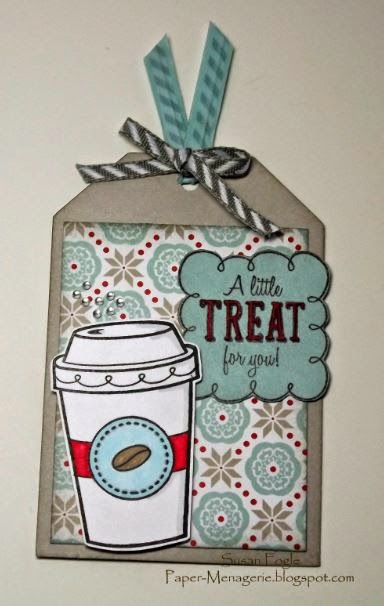
As I was cleaning up my studio the other day, I came across a few scraps of Snowhaven Paper and extra Cricut cut tags. I decided to assemble the pieces and make a few tags that can go on gifts or adorn a card. I used the thin Glacier Washi Tape on the Slate Twist Ties as an experiment and liked the result. It's hard to tell in the picture, but the cup has "Bitty Sparkles" steam coming from the top.


Thanks for stopping by today! Be sure to check out Lisa's blog and Donna's blog to see what they have created for you!

Supplies Used:

Card:
D1651 Wavy Blooms
1385 White Daisy Cardstock
Z1375 Kraft Cardstock
44751 Archival Black Ink Pad
Z2469 Shin Han Colorless Blender
Z2454 Shin Han Leaf Green
Z2465 Shin Han Turquoise Blue
Z2461 Shin Han Peacock Green
Z2464 Shin Han Tender Pink
Z2452 Shin Han Golden Yellow
Z3066 Boardwalk Washi Tape Pack
Z3067 Carnival Washi Tape Pack
Z3042 Coral Reef Sequins
X254 White Cards with Envelopes
Z2060 3-D Foam Tape

Tag:
C1616 Treats of Frendship
X7188B Snowhaven Paper Pack
44751 Archival Black Ink Pad
Z2469 Shin Han Colorless Blender
Z2448 Shin HanCarmine Red
Z2445 Shin Han Barely Beige
Z2451 Shin Han Clay
Z1864 Slate Twist Ties
Z1989 Slate Diagonal Striped Ribbon
Z3066 Boardwalk Washi Tape Pack
Z1263 Bitty Sparkles
Z2060 3-D Foam Tape
Other- Shin Han Frost Blue Marker